<i>Q0-100</i><i>Satellite</i>
  • © 2023 Neil Austin Contact Me 0

Q0-100Satellite

About the QO100

The QO100 satellite transponders are a type of satellite transponder that are designed for use by amateur radio operators. They are part of the QO-100 geostationary amateur radio satellite, which was launched in 2018 and is operated by the Qatar Amateur Radio Society (QARS) in collaboration with Es'hailSat.

The QO100 transponders are designed to operate in the amateur radio 2.4 GHz band, and provide both narrowband and wideband modes of operation. The narrowband transponder provides a bandwidth of 250 Hz, and is designed for use with modes such as CW and SSB. The wideband transponder provides a bandwidth of 2.7 kHz, and is designed for use with modes such as FM and digital modes like DVB-S2.

One of the unique features of the QO100 transponders is that they are capable of providing full-duplex operation, which allows operators to transmit and receive at the same time. This is a significant advantage for satellite communication, as it allows operators to communicate with each other using a single transponder, rather than having to use separate transponders for transmit and receive.

To use the QO100 transponders, amateur radio operators need to have an appropriate ground station setup, which typically includes a high-gain antenna, a transceiver capable of operating in the 2.4 GHz band, and a computer or other device for controlling the transceiver and decoding digital modes. Operators also need to obtain a license to operate on the QO-100 satellite, which is typically issued by their national amateur radio authority.

Overall, the QO100 satellite transponders are a valuable resource for amateur radio operators who are interested in satellite communication. They provide a unique opportunity for operators to communicate with each other over long distances using satellite technology, and offer a wide range of modes and features to support different types of communication.
What you need…

To receive transmissions from the QO-100 satellite, you will need to set up a ground station with the appropriate equipment. Here are the basic steps you will need to follow:

Antenna: You will need a high-gain antenna that is designed to operate in the 2.4 GHz band. A popular choice for QO-100 reception is a dish antenna, such as a 60cm or 90cm offset dish.

LNB: You will also need a low-noise block downconverter (LNB) that is designed to receive signals in the 10.7 GHz to 12.75 GHz range. The LNB will downconvert the received signals to a lower frequency that can be processed by your receiver.

Receiver: You will need a receiver that is capable of operating in the 2.4 GHz band and can demodulate the signals from the satellite. A popular choice for QO-100 reception is the SDRplay RSPduo, which can cover the entire 2.4 GHz band and is compatible with popular software such as SDR Console.

Computer: You will need a computer or other device for controlling the receiver and decoding digital modes. Popular software for QO-100 reception includes SDR Console, SDR# (SDR Sharp), and the DATV Express software for digital video transmission.

Once you have set up your ground station, you will need to aim the antenna towards the QO-100 satellite and adjust the LNB frequency to the correct value (usually around 9.75 GHz or 10.0 GHz depending on your LNB). You can then use your receiver and software to tune into the QO-100 transponders and decode the signals.

It's important to note that you will need to obtain a license to operate on the QO-100 satellite, which is typically issued by your national amateur radio authority. You will also need to follow appropriate operating procedures and be considerate of other operators who are using the satellite.
My QO100 Project
This is one way to Receive and Transmit to the Q0-100
Stacks Image 28
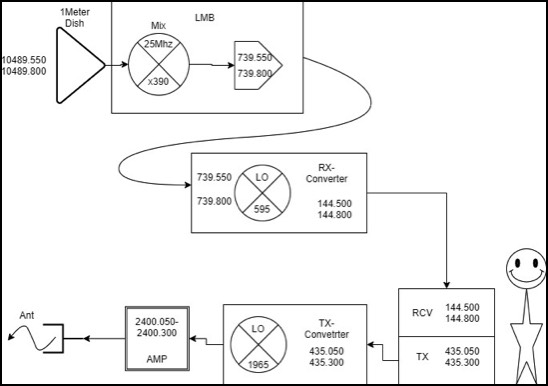
If you look at the diagram the output of the satellite is between 10489.550 to 10489.800 MHz. A Standard LMB practically receives on a frequency just above this range but can still be used. This is reflected from the dish into the LNB where a 25 MHz source is multiplied by 390 and the difference in frequency mixed with the received signal to produce an IF of 739.550- 739.800 Mhz.

Some LNB's have a different crystal freq for eg. 27Mhz. Same principal applies but the IF out will be different.

Always try to chose a PLL locked LMB for less drift except in my case where I will use a modified LMB where I will inject a frequency of 25 MHz which is locked to a GPS standard.
From the LNB we then take the signal into a Transverter/Converter and mixed again with a local oscillator of 595 MHz to give us out IF of 144.500-144.800 MHz.
You can then use this frequency to feed into your 2 meter rig.
There is a reason this IF in the 2 meter band is chosen which I will explain later but has to do with the fact that you will be transmitting and receiving your transmission into the satellite simultaneously.
For the uplink we chose 70cm. This is fed into a converter and mixed with a local oscillator (1965 MHz) to give us our 2400 MHz signal out into a right hand circular polarised antenna pointing towards the satellite.

Receiving and Power Supplys

Stacks Image 37
So for the receive, I bought the Amsat DL down converter V3 with GPS lock option. Here I mounted it into a box but before I did, I located the I2c header pins and found a cheap OLed display on EBay and interfaced it with the board. This gives you information on the boards condition and what's happening during 'Boot'. It also gives me the 10 MHz signal out to feed into the transmit transverter.
Stacks Image 41
Power supply (12v, 13v, 28v) and receiver mounted in their cases and ready to test once the dish is aligned.
The way I will try to find the satellite is to mount a PLL LNB and use SDR radio and monitor the output of the LNB. By all accounts I should be able to find the noise floor of the Transponder/s and adjust for maximum noise and also see any transmitting signals.
At the moment, the dish is up and boxes containing power supply and receive converter are mounted behind the dish. as for finding the satellite, it alludes me :)